DZF Web Blog2024-05-30T13:32:05.118Zhttp://www.dzfweb.com.br/Douglas Zanco FrancoHexoMy first Google Cloud Certificatehttp://www.dzfweb.com.br/2024/04/06/My-first-google-cloud-certificate/2024-04-06T11:05:01.000Z2024-05-30T13:32:05.118ZI’m happy to announce that I have recently earned my first Google Cloud Professional Developer Certificate. This certificate is a testament to my expertise in developing and deploying highly scalable applications on Google Cloud Platform. It demonstrates my proficiency in designing, building, and managing cloud-native applications using Google Cloud technologies.
Issuer
Course
Year
Professional Cloud Developer Certification
2024
These certificates have equipped me with the skills and knowledge needed to excel in the field of cloud computing, including cloud-native application development, cloud architecture, and cloud security.
]]><p>I’m happy to announce that I have recently earned my first Google Cloud Professional Developer Certificate. This certificate is a testament to my expertise in developing and deploying highly scalable applications on Google Cloud Platform. It demonstrates my proficiency in designing, building, and managing cloud-native applications using Google Cloud technologies.</p>Enhancing WSL Connectivity with VPN Integration (Cisco, Kaspersky, others)http://www.dzfweb.com.br/2024/02/20/Enhancing-WSL-Connectivity-with-VPN-Integration-Cisco-Kaspersky-others/2024-02-20T22:15:11.000Z2024-05-30T13:32:05.118ZIntroduction
Windows Subsystem for Linux (WSL) provides a seamless integration of Linux with Windows, allowing users to run a Linux distribution alongside their Windows environment. However, when using a VPN, configuring WSL to work seamlessly with it can be a bit tricky. In this guide, we will walk you through the steps to ensure that your WSL setup remains connected and functional while your VPN is active.
Step 1: Edit WSL Configuration
The first step is to edit the WSL configuration file to execute a script when WSL starts. Open the WSL configuration file using your preferred text editor (in this case, we use vim):
vim /etc/wsl.conf
Add the following lines to the file:
1
2
3
4
5
[boot]
command=sudo /bin/vpn-dns.sh

[network]
generateResolvConf = false
Save and exit the editor.
Step 2: Create the Script
Now, create the script that will be executed during WSL startup. Create a new file using vim or any text editor of your choice:
vim /bin/vpn-dns.sh
Paste the following script into the file:
1
2
3
4
5
6
7
8
9
10
11
echo"Getting current DNS servers, this takes a couple of seconds"
To apply the changes, restart WSL using the following command in either Command Prompt or PowerShell:
wsl --shutdown
Conclusion
By following these steps, you have successfully configured WSL to work seamlessly with your VPN. This ensures that your DNS settings are appropriately adjusted, allowing WSL to maintain connectivity even when your VPN is active. Enjoy a hassle-free experience with WSL in a VPN-enabled environment!
]]><h2 id="Introduction"><a href="#Introduction" class="headerlink" title="Introduction"></a>Introduction</h2><p>Windows Subsystem for Linux (WSL) provides a seamless integration of Linux with Windows, allowing users to run a Linux distribution alongside their Windows environment. However, when using a VPN, configuring WSL to work seamlessly with it can be a bit tricky. In this guide, we will walk you through the steps to ensure that your WSL setup remains connected and functional while your VPN is active.</p>New certification achieved: Azure DevOps Experthttp://www.dzfweb.com.br/2024/02/16/New-certification-achieved-Azure-DevOps-Expert/2024-02-16T14:28:41.000Z2024-05-30T13:32:05.122ZI’m excited to share that I’ve recently achieved the Azure DevOps Expert certification. This certification is designed for DevOps professionals who combine people, process, and technologies to continuously deliver valuable products and services that meet end-user needs and business objectives.
The Azure DevOps Expert certification validates your skills in the following areas:
Design and implement strategies for collaboration, code, infrastructure, source control, security, compliance, continuous integration, testing, delivery, monitoring, and feedback.
Implement and manage build infrastructure.
Implement code flow and build models.
Implement a mobile DevOps strategy.
Manage application configuration and secrets.
Implement and manage infrastructure as code (IaC).
Manage code quality and security policies.
Implement a container build strategy.
Design a release strategy.
Set up a release management workflow.
I’m proud to have achieved this certification and look forward to applying my new skills and knowledge to my work as a software engineer. I believe that this certification will help me stand out in the job market and open up new opportunities for career growth and advancement.
Issuer
Course
Year
Microsoft Certified: Azure DevOps Expert
2024
]]><p>I’m excited to share that I’ve recently achieved the Azure DevOps Expert certification. This certification is designed for DevOps professionals who combine people, process, and technologies to continuously deliver valuable products and services that meet end-user needs and business objectives.</p>I've just got an AZ-204 certificatehttp://www.dzfweb.com.br/2023/11/08/I-ve-just-got-an-AZ-204-certificate/2023-11-08T08:04:35.000Z2024-05-30T13:32:05.118ZAzure and Microsoft in general always was part of my background as a Software Engineer. I’ve been working with Azure for a long time, but my experiences was more leading teams that used to use Azure, I mean, I was not the one who was doing the actual work. I was more like the manager supporting the expert team building the solutions. Yeah, of course, I was doing some work, but it was more like a support role. And this certification was a personal challenge for me to prove myself that I was able to do the job with my hands if it is needed.
The AZ-204 certification, also known as “Developing Solutions for Microsoft Azure”, is designed for Azure developers. It validates your skills in designing, building, testing, and maintaining cloud applications and services on Microsoft Azure. As a candidate for this exam, you’ll be responsible for participating in all phases of development, including requirements gathering, design, development, deployment, security, maintenance, performance tuning, and monitoring.
The exam measures your ability to accomplish the following technical tasks:
Develop Azure compute solutions
Develop for Azure storage
Implement Azure security
Monitor, troubleshoot, and optimize Azure solutions
Connect to and consume Azure services and third-party services
I’m glad to achieve this and hope for a possible expert certificate in the future, let’s see…
Issuer
Course
Year
Microsoft Certified: Azure Developer Associate
2023
]]><p>Azure and Microsoft in general always was part of my background as a Software Engineer. I’ve been working with Azure for a long time, but my experiences was more leading teams that used to use Azure, I mean, I was not the one who was doing the actual work. I was more like the manager supporting the expert team building the solutions. Yeah, of course, I was doing some work, but it was more like a support role. And this certification was a personal challenge for me to prove myself that I was able to do the job with my hands if it is needed.</p>My AI toolkit for boost my dev productivityhttp://www.dzfweb.com.br/2023/10/23/My-AI-toolkit-for-boost-my-dev-productivity/2023-10-23T17:33:23.000Z2024-05-30T13:32:05.118ZAs a developer, I’m always looking for ways to boost my productivity. And it turns out that I’m not alone. According to recent research, AI tools like GitHub Copilot and Tactiq can have a significant impact on developer productivity.
AI Productivity Research
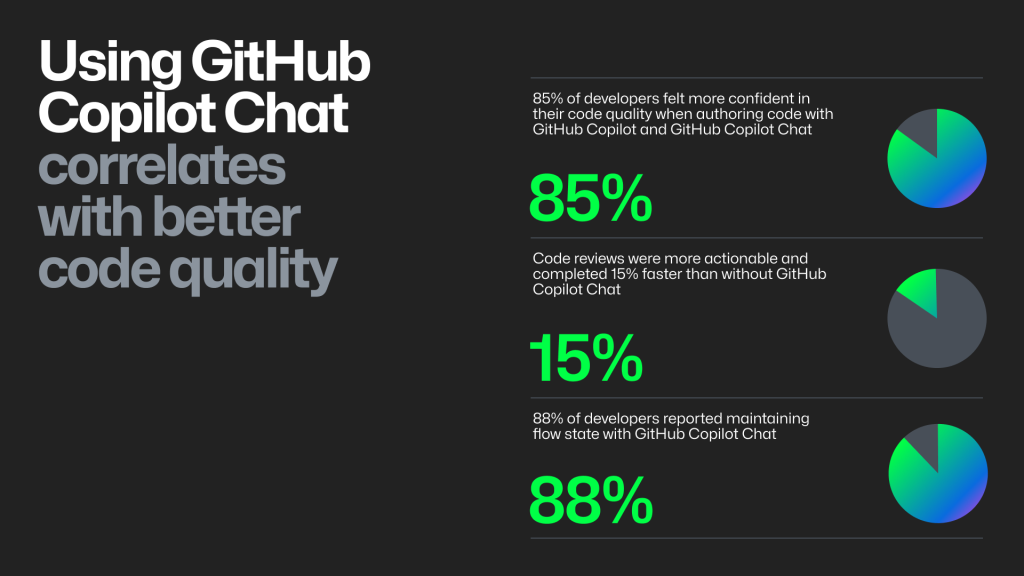
One study found that the quality of the code authored and reviewed was better across the board with GitHub Copilot Chat enabled, even though none of the developers had used the feature before.
85% of developers felt more confident in their code quality when authoring code with GitHub Copilot and GitHub Copilot Chat.
Code reviews were more actionable and completed 15% faster with GitHub Copilot Chat.
88% of developers reported maintaining flow state with GitHub Copilot Chat because they felt more focused, less frustrated, and enjoyed coding more, too.
So, it’s clear that AI tools have a lot of potential when it comes to boosting developer productivity. And two of the tools that I’ve found to be particularly helpful are GitHub Copilot and Tactiq.
GitHub Copilot
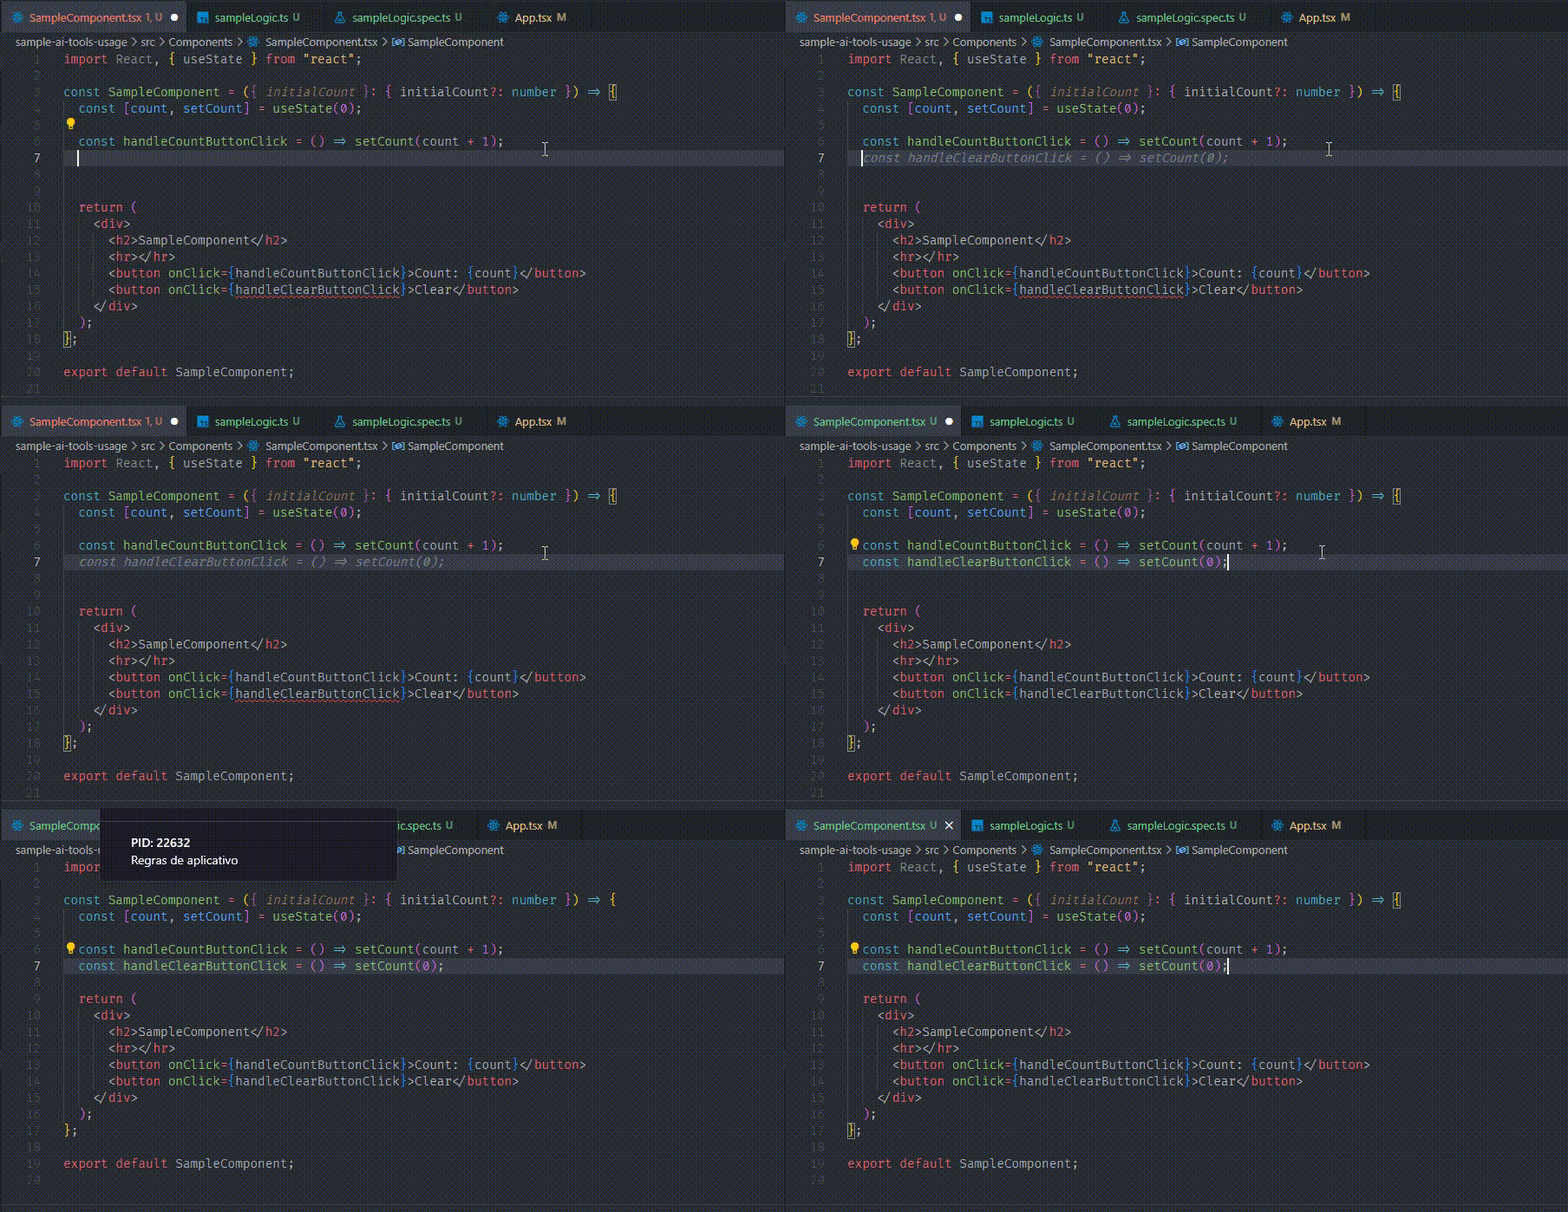
GitHub Copilot is an AI programming assistant that has been a game-changer when it comes to coding. With Copilot, I can quickly generate code snippets and get suggestions for how to complete functions and methods. It’s like having a coding partner who’s always there to help me out.
When I’m working on a new project, I’ll often use Copilot to generate some starter code. This saves me a lot of time and helps me get up and running quickly. And if I’m stuck on a particular piece of code, I’ll use Copilot to get suggestions for how to complete it. This has been incredibly helpful when I’m working with a new language or framework.
Smart Auto-complete
One of the key features that sets Copilot apart is its smart auto-complete functionality. With this feature, Copilot can suggest code snippets and complete functions and methods based on the context of your code. This saves you time and helps you write code more efficiently.
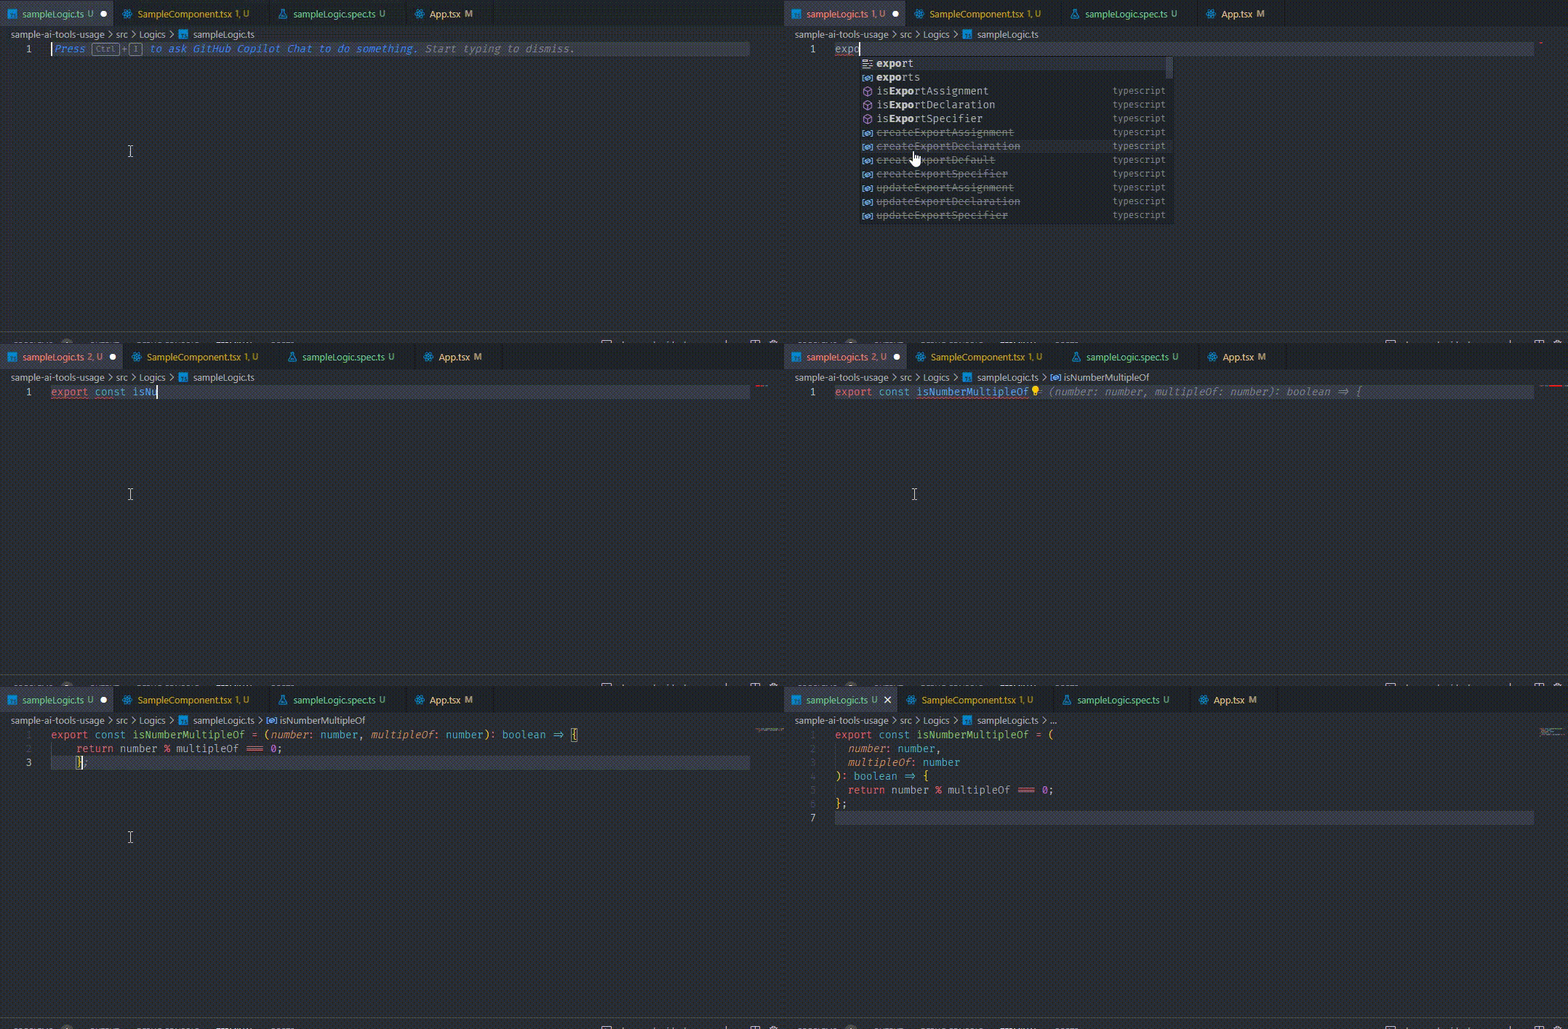
Code generation
Another powerful feature of Copilot is its code generation capability. With Copilot, you can quickly generate code for common tasks like file I/O, string manipulation, and more. This feature is particularly helpful when you’re working with a new language or framework and need to get up and running quickly.
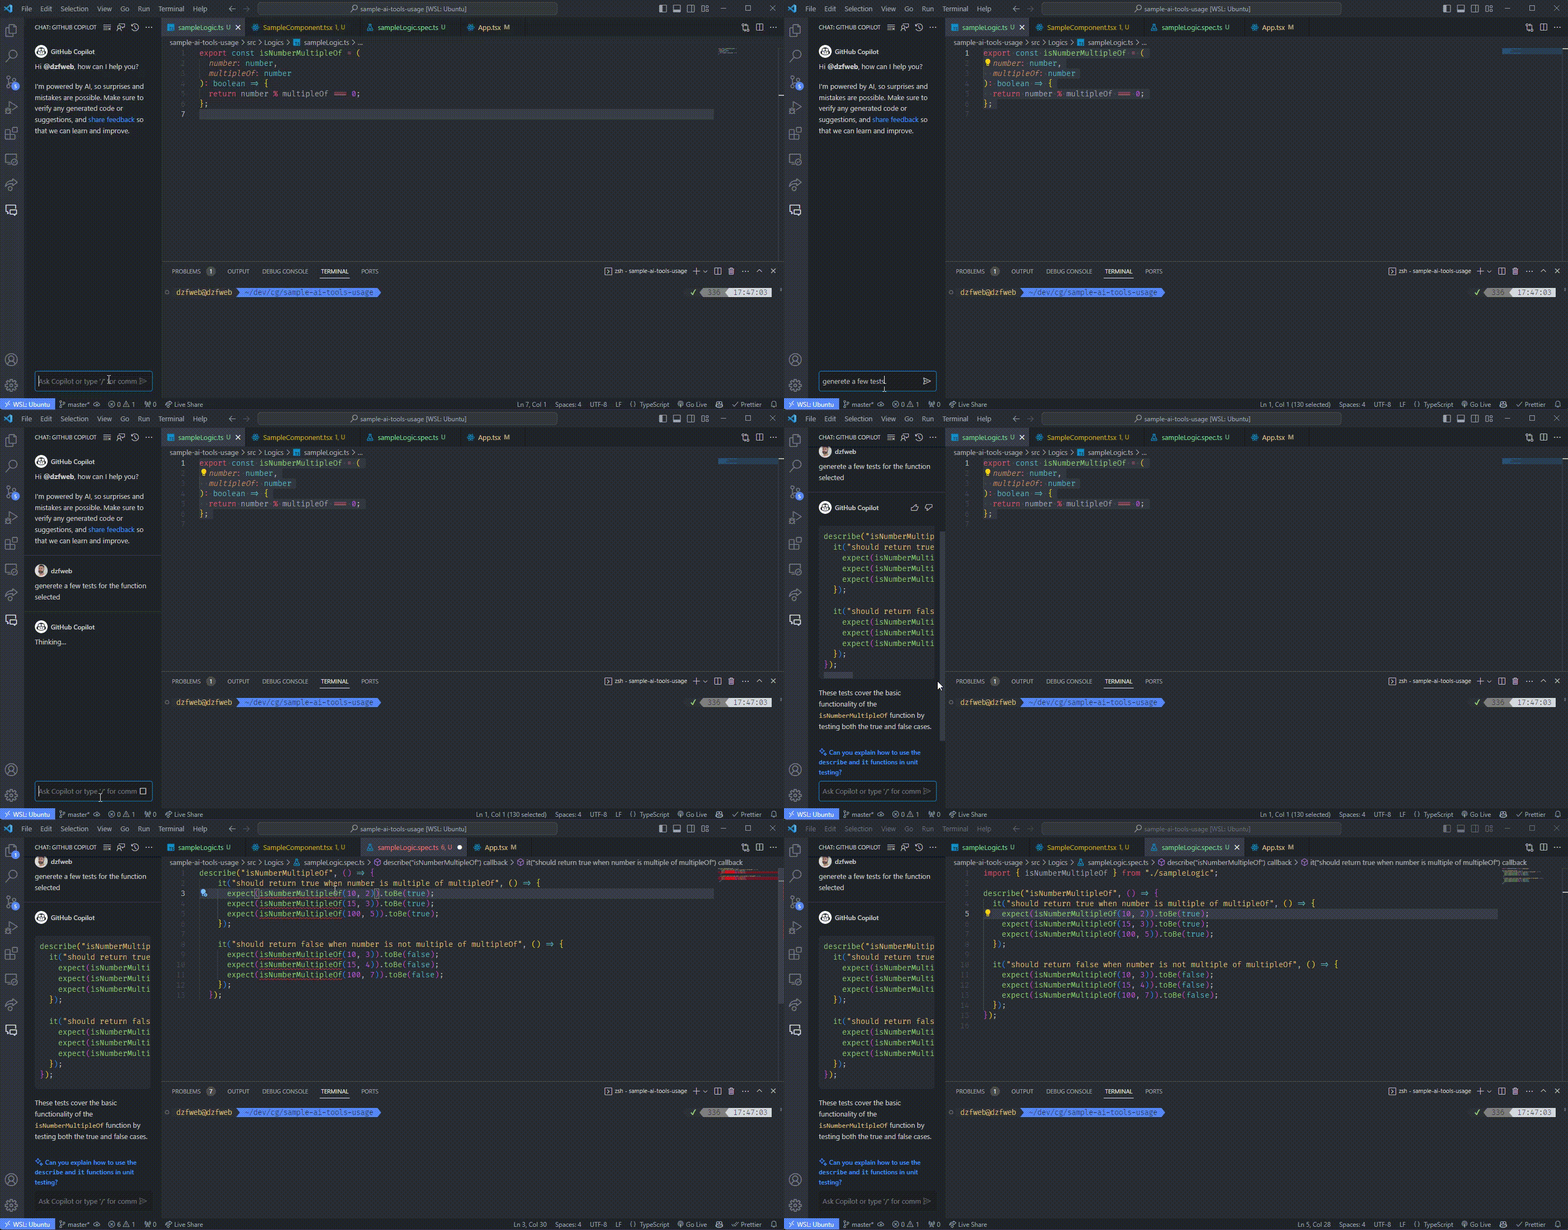
Test generation
Finally, Copilot also has a test generation feature that can help you write better code. With this feature, Copilot can generate test cases for your code, ensuring that it’s working as expected and reducing the likelihood of bugs. This feature is especially useful for developers who are new to testing or who want to improve their testing practices.
Tactiq
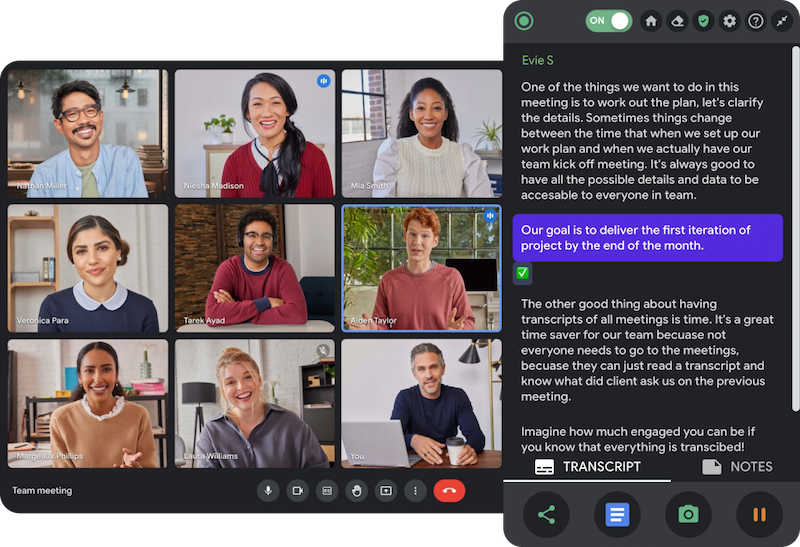
Another tool that I’ve found incredibly helpful is Tactiq. This tool is perfect for anyone who spends a lot of time in meetings. With Tactiq, I can easily transcribe meetings and keep track of important details. It’s a great way to stay organized and make sure that I don’t miss anything important.
During meetings, I’ll use Tactiq to transcribe what’s being said. This helps me stay focused and ensures that I don’t miss any important details. Plus, I can easily refer back to the transcript later if I need to.
Another cool feature of Tactiq (which I believe uses gpt-4 behind the scenes) is the ability to generate action points.
Overall, Tactiq has been a huge help in keeping me organized and productive. And I highly recommend it to anyone who spends a lot of time in meetings.
]]><p>As a developer, I’m always looking for ways to boost my productivity. And it turns out that I’m not alone. According to recent research, AI tools like GitHub Copilot and Tactiq can have a significant impact on developer productivity.</p>New AI certificateshttp://www.dzfweb.com.br/2023/10/23/New-AI-certificates/2023-10-23T17:09:01.000Z2024-05-30T13:32:05.122ZAs a software engineer, staying up-to-date with the latest technologies and trends is crucial to remain competitive in the job market. That’s why I’m excited to share that I recently earned several new certificates in the field of Artificial Intelligence (AI).
Issuer
Course
Year
Career Essentials in Generative AI by Microsoft and LinkedIn
2023
Ethics in the Age of Generative AI
2023
Generative AI: The Evolution of Thoughtful Online Search
2023
Introduction to Artificial Intelligence
2023
Streamlining Your Work with Microsoft Bing Chat
2023
Introduction to Generative AI
2023
These certificates have equipped me with the skills and knowledge needed to excel in the field of AI, including Generative AI, Computer Ethics, Search Engine Technology, and Artificial Intelligence for Business. With these certificates, I am confident that I can take on more challenging projects and contribute to my organization’s success. Moreover, these certificates demonstrate my commitment to professional development and my willingness to learn and adapt to new technologies.
In conclusion, earning these certificates has been a significant achievement for me, and I am excited to apply my new skills and knowledge to my work as a software engineer. I believe that these certificates will help me stand out in the job market and open up new opportunities for career growth and advancement.
]]><p>As a software engineer, staying up-to-date with the latest technologies and trends is crucial to remain competitive in the job market. That’s why I’m excited to share that I recently earned several new certificates in the field of Artificial Intelligence (AI).</p>.NET Microservices: Architecture for Containerized Applications with .NEThttp://www.dzfweb.com.br/2017/10/04/NET-Microservices-Architecture-for-Containerized-Applications-with-NET/2017-10-04T15:09:05.000Z2024-05-30T13:32:05.118ZMicrosoft has released an official and free ebook on .NET architecture for applications in containers with docker. To make it easier for ereaders to read, I converted it to Gitbook.
]]><p>Microsoft has released an official and free ebook on .NET architecture for applications in containers with docker. To make it easier for ereaders to read, I converted it to Gitbook.</p>Blazor brings .NET back to browsershttp://www.dzfweb.com.br/2017/09/10/Blazor-brings-.NET-back-to-browsers/2017-09-10T15:08:52.000Z2024-05-30T13:32:05.118ZBlazor is an experiment created by Steve Sanderson that makes .NET possible for browsers using WebAssembly and DotNetAnywhere. It is not a complete Framework like Flash or Silverlight, but a test to see what is possible to do with such technology.
WebAssembly describes itself as a standard for “a secure, testable, and even deployable JavaScript virtual machine execution environment.” Although it performs better in browsers that support it natively, WebAssembly can be interpreted by older browsers through converters and asm.js.
Currently, WebAssembly is designed to support applications written in C and C++, acting as a backend compiler for clang/LLVM. To convert C into C#, Blazor uses DotNetAnywhere, created by Chris Bacon, which is nothing more than an MSIL interpreter for the .NET Framework. The DotNetAnywhere project ended about 6 years ago.
Blazor makes the following changes to DotNetAnywhere:
Development support with Emscripten
Support for JavaScript calls through .NET (and vice versa)
Adds primitive interop features (eg GCGandle)
Fixes some bugs
Support for loading .NET Core-style resources
Applications with Blazor are built using Razor templates, which run in the browser rather than on the server. According to the documentation, a simple “Hello world” requires a 300KB download. This includes everything needed, namely:
small and lightweight .NET runtime
Core libs
Application code
Encapsulated codes needed to run the WebAssembly code
No effort has been made to remove unnecessary code, so it’s still possible to reduce the size further.
To see Blazor in action, watch the video of the presentation given at the NDC conference “Web Apps can’t really do that, can they? - Steve Sanderson” (Web apps really can’t do that, can they?).
]]><p>Blazor is an experiment created by Steve Sanderson that makes .NET possible for browsers using WebAssembly and DotNetAnywhere. It is not a complete Framework like Flash or Silverlight, but a test to see what is possible to do with such technology.</p>How easy is it to create a plugin for NativeScript?http://www.dzfweb.com.br/2017/05/25/How-easy-is-it-to-create-a-plugin-for-NativeScript/2017-05-25T15:08:36.000Z2024-05-30T13:32:05.118ZThere is a growing number of plugins available for NativeScript that are developed by the community, and the reason for this is not only the willingness and sense of contribution from developers, but also the ease of developing a plugin for NativeScript, especially after version 3.0.
In this article, I’ll demonstrate how I developed NativeScript Emoji, my first UI Plugin for NativeScript. By the end of this article, I hope you’ll be interested in you the interest in developing a plugin and contributing to the community of NativeScript developers, everyone wins when this happens!.
Por onde começar?
I will demonstrate the basics that you need to know to get started, but if you prefer, the complete documentation can be found here.
The easiest way to get a plugin for NativeScript is to use the NativeScript Plugin Seed, created by NathanWalker. This library will do all the hard work of creating the structure of a NativeScript plugin, and that’s really amazing. See how easy it is:
1 2 3 4
git clone https://github.com/NathanWalker/nativescript-plugin-seed.git myplugin cd myplugin npm run postclone npm run setup
Now, with just these steps you will have created all the necessary structure to develop, test and publish your plugin, but before you start, let’s make a brief introduction about the plugin we are going to develop together in this article.
O plugin NativeScript Emoji
The purpose of this plugin is to deliver an element to the interface to display Emojis in a friendly way. My initial idea was to have a TextView element. When setting the unicode or hexadecimal value of emoji in the corresponding property:
<Emoji:Emoji icon="128514"> exibir :😂
The plugin would do the conversion to Emoji, and here I leave a highlight again for the NativeScript community in Slack (Haven’t joined us yet? Sign up now), which made the excellent suggestion to replace the unicode property with a friendlier and easier-to-remember value:
<Emoji:Emoji name="joy"> exibir :😂
Implementação para Android e iOS
Now that we already have the definition of the plugin and the structure created, get started. The first thing we need to do is define the common implementation across platforms, we know that we will have a name property that will serve both Android and iOS, this setting is made in the common file that was generated in the first step of this article .
emoji.common.ts
1 2 3 4 5 6 7 8 9 10
import { View, Property } from "ui/core/view"; export class EmojiCommon extends View { name: string; } export const nameProperty = new Property<EmojiCommon, string>( { name: "name", defaultValue: "" }); nameProperty.register(EmojiCommon);
As this is an ui plugin, we need to extend the View class. The attributes of the element that we will create, we define creating a new object of type Property.
The property name we define the name of the attribute and the default value of it, as the name itself suggests, we define the property defaultValue. If the value of this attribute were different from the type string, which is not our case, we would need to set the value for the property valueConverter.
The emojis encoding is distinct for each platform, so we need to have a database to store those values to query during the execution of the plugin.
emoji.database.ts
1 2 3 4 5 6 7 8 9 10 11 12 13
export class EmojiDatabase {
    public static list(): Array<any> {
      return [
    {
        "name": "FACE WITH TEARS OF JOY",
        "unicode": "😂",
        "hexcode": "1F602",
        "codepoint": [
            128514
        ],
        "shortname": "joy"
    }];
}
Implementação para Android
Now that we have the attributes of the element that we will create, we need to implement the code responsible for generating the element corresponding to each platform. NativeScript will interpret the specific code for Android at runtime through the following file.
import { nameProperty, EmojiCommon } from "./emoji.common";
import { EmojiDatabase } from "./emoji.database";
import * as utils from "tns-core-modules/utils/utils";
declare var java: any;
global.moduleMerge(EmojiCommon, exports);
export class Emoji extends EmojiCommon {
  [nameProperty.getDefault](): string {
    return '';
  }
  [nameProperty.setNative](value: string) {
    let emoji = EmojiDatabase.list().find((el) => el.shortname ##= value).codepoint[0];
    this.nativeView.setText(new java.lang.String(java.lang.Character.toChars(emoji)));
  }
  private _android: android.widget.TextView;
  get android() {
    return this.nativeView;
  }
  public createNativeView() {
    this._android = new android.widget.TextView(utils.ad.getApplicationContext());
    return this._android;
  }
}
The first step is to extend the common class created earlier. You must implement the createNativeView method too, which will make NativeScript understand that some element must be created in the View. In our case we will create a TextView.
And again here we have another great help from the framework, the NativeScript team has mapped all the native properties and methods of each platform and generated the definitions in TypeScript, which gives us the possibility to navigate through all these native definitions directly in the editor.
We must also define what the plugin will do when it receives the attribute name, this is defined by implementing the setNative method, which in our case will query the emoji name in the database, and based on the corresponding code, It will set the value for the previously created TextView. The getDefault method is for cases where no value is set.
Implementação para iOS
We can copy the same implementation made for Android, and only change the parts where it is created and set the value for the native element, which in the case of iOS will be the UILabel setting as follows.
import { nameProperty, EmojiCommon } from "./emoji.common";
import { EmojiDatabase } from "./emoji.database";
global.moduleMerge(EmojiCommon, exports);
export class Emoji extends EmojiCommon {
  [nameProperty.getDefault](): number {
    return 0;
  }
  [nameProperty.setNative](value: string) {
    let emoji = EmojiDatabase.list().find((el) => el.shortname ##= value).unicode;
    let nsString = NSString.stringWithString(emoji);
    this.nativeView.text = nsString;
  }
  private _ios: UILabel;
  get ios() {
    return this.nativeView;
  }
  public createNativeView() {
    this._ios = UILabel.alloc().init();
    return this._ios;
  }
}
Here again it will be possible to access the definition of the native methods for iOS, in the createNativeView method a UILabel is created and in the setNative method the value for the created element is defined.
Testando o plugin
Yes, we finished the plugin implementation and what is left is just testing. Realy fast, dont you think? To test we need to add the plugin to the demo project created in the initial steps of this article. To do this, you must execute the command:
1
npm run preparedemo
Add the element reference in the Page element of the main-page.xml file
Now let’s run the demo project on the emulators of each platform by executing the following commands.
1
2
nmm run demo.ios
npm run demo.android
Conclusão
Hopefully you can see how fast and easy it is to develop a plugin for NativeScript, the community is very open to helping as well, as well as the Telerik team that seeks to deliver with each version tools that vision make our work as a developer much more productive and i throw the invitation to you developer who is reading this article, did you develop something customized on any project? Do you have any ideas about any tools that might be useful? Contribute with us as well.
]]><p>There is a growing number of plugins available for NativeScript that are developed by the community, and the reason for this is not only the willingness and sense of contribution from developers, but also the ease of developing a plugin for NativeScript, especially after version 3.0.</p>NativeScript Course: Creating a New Project with Angular 2http://www.dzfweb.com.br/2017/04/21/NativeScript%20Course-Creating-a-New-Project-with-Angular-2/2017-04-21T15:08:24.000Z2024-05-30T13:32:05.118ZHey guys, I share with you a video lesson part of the NativeScript with Angular 2 course that I’m recording. ** Content in Portuguese **]]><p>Hey guys, I share with you a video lesson part of the NativeScript with Angular 2 course that I’m recording.<br>** Content in Portuguese **</p>GS1 Award Winner at AngelHack SP 2016http://www.dzfweb.com.br/2016/04/18/GS1%20Award-Winner-at-AngelHack-SP-2016/2016-04-18T15:08:08.000Z2024-05-30T13:32:05.118ZThis weekend I participated in the biggest hackathon in the world, present in several countries, the AngelHack edition São Paulo 2016.
The contest brought together 220 students and professionals from the areas of software programming, design and communication. There were around 30 hours of intense immersion for multidisciplinary teams, with the help of around 80 mentors, to create technological solutions in the form of applications aimed at social good or research and innovation.
My team was the winner in the Barcode Technological Innovation category. We have developed a multiplatform solution for trading and donating perishable products, taking advantage of GS1’s APIs to register and consult products by barcode.
It was a very good experience to participate in an event full of programmers and people who love technology, here are some photos.
]]><p>This weekend I participated in the biggest hackathon in the world, present in several countries, the AngelHack edition São Paulo 2016.</p>
<p>The contest brought together 220 students and professionals from the areas of software programming, design and communication. There were around 30 hours of intense immersion for multidisciplinary teams, with the help of around 80 mentors, to create technological solutions in the form of applications aimed at social good or research and innovation.</p>Talking a little bit about HASH MD5 in TISShttp://www.dzfweb.com.br/2014/09/22/Talking-a-little-bit-about-HASH-MD5-in-TISS/2014-09-22T15:05:43.000Z2024-05-30T13:32:05.122ZI created this post with the intention of helping other developers who encountered the same difficulty that I encountered during the process of developing TISS modules and HASH MD5 validations.
To introduce the text, let’s go to definitions (well summarized):
What is TISS?
_The TISS - Exchange of Information on Supplementary Health is a standard for recording and exchanging data between operators of private health care plans and medical-hospital service providers of the National Agency for Supplementary Health - ANS in Brazil. _
What is MD5 Hash?
MD5 (Message Digest algorithm 5) is a 128-bit unidirectional hashing algorithm developed by RSA Data Security, Inc., described in RFC 1321, and widely used by peer-to-peer (P2P) protocol software. -Peer), integrity checking of files and logins.
What is the purpose of the MD5 Hash in TISS?
The exchange of communication between operators and providers in the Tiss webservices is carried out in well-structured and complex XML files. The MD5 Hash exists to guarantee the integrity of the file, since the contents of the XML elements are used to generate the Hash encryption. This guarantees that the file has not been changed manually, as a simple change of characters or whitespace, for example, would completely change the MD5 HASH of the file.
How to calculate MD5 Hash for TISS?
Concatenate the contents of all elements into a single String. Remove whitespace ONLY at the beginning and end of the file. Special characters, accents and dashes must be maintained. MD5 encoding must be generated in UTF-8 standard.
Example method to generate MD5 calculation for TISS in C# .NET
Below is a simple method that I use to generate the MD5 Hash.
Method to generate HashMD5
1
2
3
4
5
6
7
8
9
10
11
12
public static string getMD5Hash(string input)
{
    System.Security.Cryptography.MD5 md5 = System.Security.Cryptography.MD5.Create();
    byte[] inputBytes = System.Text.Encoding.UTF8.GetBytes(input);
    byte[] hash = md5.ComputeHash(inputBytes);
    System.Text.StringBuilder sb = new System.Text.StringBuilder();
    for (int i = 0; i < hash.Length; i++)
    {
        sb.Append(hash[i].ToString("x2"));
    }
    return sb.ToString();
}
]]><p>I created this post with the intention of helping other developers who encountered the same difficulty that I encountered during the process of developing TISS modules and HASH MD5 validations.</p>Android and iOS development with .NET and Visual Studiohttp://www.dzfweb.com.br/2014/04/25/Android-and-iOS-development-with-.NET-and-Visual-Studio/2014-04-25T15:01:43.000Z2024-05-30T13:32:05.118ZMobile development has always been a big challenge for many developers due to their limited options of platforms to work on, be it Android or iOS. You should study different production environments, Eclipse, objective C, java, etc.
Xamarin is a great and robust paid tool (and very expensive by the way, with the cheapest usage license of $299.90 per year) for developers familiar with the .NET Framework, being able to use the huge repertoire of libraries that this amazing Microsoft framework available with C# to develop mobile applications. Xamarin has a huge documentation to study, with examples of several resources, projects ready for download, community for debate with other developers specialized in the subject.
If you are a .NET web developer and want to venture into a new development scenario, in this case Mobile Development, one of the most sought after areas for projects that is growing every year due to the mobile technological advancement, this is a very good professional tool to study.
More information on the official Xamarin website
]]><p>Mobile development has always been a big challenge for many developers due to their limited options of platforms to work on, be it Android or iOS. You should study different production environments, Eclipse, objective C, java, etc.</p>Is your .NET Project Source Code protected?http://www.dzfweb.com.br/2013/12/01/Is%20your%20.NET-Project-Source-Code-protected/2013-12-01T15:07:04.000Z2024-05-30T13:32:05.118ZProbably you Developer must have asked yourself: “Is my code protected?”. I came across this question at the end of a system that I had developed in .NET and was about to put it into production, and like any cautious developer, I started researching methodologies to protect my System and, consequently, the System’s source code.
Well, this study brought me an insecurity about the .NET Technology, which for me until then, was considered very safe. Amazingly, it is possible to extract the source code of any .NET project (C#, VB, etc). In this article I will share with you how it is possible to do this and how to protect your code and make this practice a little more difficult.
Understanding .NET DLLs and Executables
In summary, when you compile a code in .NET, it is not converted to machine language. All .NET languages are converted to MSIL (Microsoft Intermediate Language) . MSIL is converted at runtime. This process offers some advantages such as dynamically querying Assemblies and their methods. However, thanks to this process, it is also possible, through reverse engineering, to access the entire algorithm of the code, its methods, variables, etc.
.NET decompilers
Microsoft has a kind of MSIL Decompiler where it is possible to access the methods of any .NET assembly (Learn more by clicking here) however, there are some more used decompilers that offer some functions in addition, such as extracting all the source code of the Assembly, including the .CSPROJ.
I’m talking about Reflector (download here) and File Disassembler plugin (download here). You’ll see below how the two together can extract the source code of DLLs or .NET executables.
This is the Reflector Interface. As soon as you open the program, it loads the Microsoft Assembly by default, where you can browse the methods. Until then, in amazement, because with Visual Studio it is already possible to do this.
Reflector
I created a new very simple Windows Form C# project to use in the example. It has 1 Form and a method. In the Reflector > Open Assembly program I selected the executable I made, and then the program decodes the MSIL of the program and displays the methods.
Reflector
Now I’m going to use the Plugin File Disassembler by selecting it in the menu Tools > File Disassembler, in the window that opens I inform the type of Project as Windows Form and the path for the output of the decompiled files. The Plugin then extracts all source code from the selected Assembly.
Reflector
And then after this simple process and with access to the assembly source code, I can open it in Visual Studio without any problem.
Reflector
Were you amazed? Yeah, me too. And because of that I left for another search.
How to Protect .NET Codes with Dotfuscator
As of the 2012 version of Visual Studio, the Dotfuscator extension from the company PreEmptive is installed by default and can be accessed in Tools >** PreEmptive Dotfuscator and Analytics **.
1- When opening the DotFuscator Interface, start a new project File > New Project.
2- Click on Inputs and next to it, add the Assembly or Executables that you want to obfuscate. (Ex: ..ProjetoBinMeuProjeto.exe)
3- Click on Build > Build Project. This process will create a folder in your selected Project directory with the name Dotfuscated and the Executable or DLL with MSIL obfuscated.
1 Okay, your code has been protected and it is not possible to decompile. Now all you have to do is distribute the obfuscated executable to your clients. If you try to do this in Reflector, the result will be an encrypted and unreadable file.
]]><p>Probably you Developer must have asked yourself: “Is my code protected?”. I came across this question at the end of a system that I had developed in .NET and was about to put it into production, and like any cautious developer, I started researching methodologies to protect my System and, consequently, the System’s source code.</p>